OTT user’s manual 1.3
 General notes
Contributing to the blog-driven sections of OTT is pretty straightforward… honest. At its simplest, all you’ve got to do is create a new post, give it a name, write your stuff and then select the appropriate category box [about which, more below] – then publish.
If you don’t want to get involved in any of that, though, simply email your contribution to me and I’ll put it online.
The most important thing to know is: you can’t break the site – so don’t worry about experimenting.
Here, though, are some things you should know which will ensure you follow house style, and – should you want to – help you tart up your pages a little.
Post titles:These are written in sentence case, i.e. the first word is capitalised, but none of the others are, unless they’re proper nouns.
Writing: This is pretty straightforward, with the tools available fairly obvious – in fact, pretty similar to MS Word. So you can format as you go (TV programme and movie titles in italics, remember).
![]()
Preview text: The first paragraph of your post should be the preview text that shows up on the index page. To make this happen, go to the end of your para and then click on the ‘Insert More Tag’ icon [shown left].
![]() Images: You can insert images by clicking on the first icon in the ‘Add media’ field [shown here]. There are various things to bear in mind about images, but these are mainly contingent on what sort of a post you’re creating (a blog post, a review, a big ol’ front page story…). For now, all you need to know are images are left justified (click on the ‘Left’ option when inserting the picture) and should not themselves link to anywhere (click on ‘None’ for ‘Link URL’). Oh, and they should come after the preview text, so they don’t appear on any index pages… unless you’re posting in the ‘updates’ category.
Images: You can insert images by clicking on the first icon in the ‘Add media’ field [shown here]. There are various things to bear in mind about images, but these are mainly contingent on what sort of a post you’re creating (a blog post, a review, a big ol’ front page story…). For now, all you need to know are images are left justified (click on the ‘Left’ option when inserting the picture) and should not themselves link to anywhere (click on ‘None’ for ‘Link URL’). Oh, and they should come after the preview text, so they don’t appear on any index pages… unless you’re posting in the ‘updates’ category.
![]() Links: That’s the icon you click to insert links. If you’re linking to another part of OTT, then once you’ve popped in the page’s address, select ‘Open link in the same window’ in the drop-down that appears. Referrals to other sites, though, should be ‘Open link in a new window’.
Links: That’s the icon you click to insert links. If you’re linking to another part of OTT, then once you’ve popped in the page’s address, select ‘Open link in the same window’ in the drop-down that appears. Referrals to other sites, though, should be ‘Open link in a new window’.
Tags: Obviously, you’ll be writing about telly, so tag with the channel name, followed by the programme title (where applicable). The channel formats are: BBC1 to 4, ITV1 to 4, C4, E4, More4, Five etc. There will also be subjects that we generally touch upon, and I guess these will become obvious as we go along. At the moment, Ratings is definitely one. I’ll update the list as and when. If you’re using an already existing tag, this’ll prefill as you type – so that should keep you right.
Categories
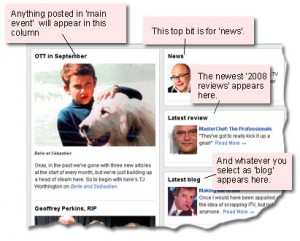
The category you pick for your post defines both where it appears on the front page [see below], and under which sub-menu it’s filed.
This is another list that will grow, but for the time being, all you need to know about are the following…
reviews 2008
blog
news
main event
Inevitably, each category requires slightly different instructions.
Reviews
Title field: Put the programme name in here.
Transmission date: To record this, go to the ‘Publish Status’ box on the right [as illustrated, right], and click on ‘Edit’. In there, select the show’s TX date, including time.
Channel info: The idea here is to have the appropriate TV channel logo at the very start of the review. I’ve already amassed a few which are now in the site’s library. Go to ‘Add an image’ and in there click on ‘Media Library’. Select the relevant logo (if it’s not there, drop me a line). As per *every* image, this is to be left-justified, with no link. Don’t worry about the image size (this thing offers you thumbnail, medium and full size – but it’s already on the right setting). The following channel names are available: bbc1.gif | bbc2.gif | bbc3.gif | bbc4.gif | bbcparliament.gif | cbeebies.gif | itv1.gif itv2.gif | itv3.gif | itv4.gif | c4.gif | e4.gif | more4.gif | five.gif
Text and further images: Write in your text, either directly into the blog (it has a spell check and everything), or paste it in from Word (there’s a little Word clip board icon on the toolbar for this). Upload or nab further relevant pictures if you fancy – but nothing too big which will screw up the table width. Oh, and you should caption any pictures too (not those channel logos, though!).
Preview text: The first paragraph of the review should be the preview text that shows up on the reviews index page. To make this happen, go to the end of your para and then click on the ‘Insert More Tag’ icon [shown left].
Tags: Remember to put in the channel name, then a comma, then the programme title.
Category: Check ’2008 reviews’.
Custom Fields: Right, here’s where we get slightly techie. This field governs what thumbnail image will appear alongside your review on the front page. Now, you can skip this bit completely, and a default OTT picture will appear beside your work. But, it’ll look better with something more specific. So, in the drop-down select ‘Thumbnail’. In the ‘Value’ box you can write: images/[channel name].gif and the channel’s logo will be the thumbnail. Alternatively, if you’re happy about FTP-ing, upload your own image onto the OTT server, in the ‘images’ folder in the site’s root. Or, upload to your own webspace and place a link to it in the ‘Value’ box. NB: thumbnail images must be 70px by 70px.
Publish: Done all that? Then hit the ‘Publish’ button in the right-hand column and (hopefully) your review is now on the site.
Blog and news
This is similar but – hooray! – simpler to reviews. So I’ll make this quick.
Text and images: As per. Nothing to huge picture-wise, please.
Preview text: Short and snappy, please, to fit in that front page box.
Tags: Channel name, programme name and anything else sensible.
Category: Check ‘blog’ or ‘news’.
Custom Fields: We’re back in front page thumbnail territory again. If you can rustle up your own 70px by 70px image online, then pop that in the ‘Value’ field. Failing that, there’s a default blog image you can use: images/blog.gif or images/news.gif
Publish: And now hit that button.
Main event
Even simpler, cos we don’t have to worry about that pesky front page thumbnail – so no ‘Custom Field’ nonsense. But, remember, whatever’s published here will appear as the top story on the site. Eventually, I’ll be creating different sub-categories such as ‘Previews’, ‘Competitions’ and the like which I’ll ask you to check in addition to ‘updates’. But don’t worry about that for now. All your really have to fear is…
Images: At the start of your text, insert a left-justified image. This must be 290px wide. If it’s more than that, the front page will screw up. Less than that and… well, it won’t look so nice (actually, you might get away with it – feel free to try). It would be handy if the thing was also 200px high, but that’s not quite so important. You can add the image using that same button. NB: If the whole thing is too much of a pain in the arse, though, don’t worry about images at all, and just go straight in with the text.
Preview text: As per above, move your cursor to a suitable break-off point early in your text and then hit the ‘Insert More Tag’ icon [shown left]. If you’re writing something pretty short anyway, don’t worry about this.
What to write? Good question. To be honest this hasn’t been defined yet – it’s going to be things like TV news, what to watch tonight, previews, new things on the site, etc. This’ll develop over time and hopefully it should all become clear.
Tags: Remember them?
Publish: Easy, eh?
And that, I think, is all you need to know for now. Questions? drop me a line. This page will be updated as we go along. Oh, and thanks so much for reading, and expressing an interest in contributing!
- Graham


